Jupyter is an open-source web application that allows you to create and share documents that contain live code, equations, visualizations and explanatory text. Uses include: data cleaning and transformation, numerical simulation, statistical modeling, machine learning and much more.
This application can be utilized interactively via the HPC OnDemand web interface.
We try to maintain Jupyter kernel configurations for all of our system Python and R modules. If you require additional kernels or the use of custom environments, you can add your own kernels to your personal configuration. Detailed instructions on adding a custom Python environment can be found here.
New versions may add or remove minor additional features or integrations not mentioned on this page depending on compatibility with newer versions of core packages.
This is a list of common pitfalls for jupyter users on the cluster. Some of these are discussed in other sections of this documentation in more detail.
%load_ext rpy2.ipython` causes an error. To fix please restart
jupyter after loading the rpy2 module$XDG_RUNTIME_DIR variable:
$ unset XDG_RUNTIME_DIR    # (bash)
$ unsetenv XDG_RUNTIME_DIR # (tcsh)
The cause of this error is the
$XDG_RUNTIME_DIR variable
exported from the login node pointing to a non-existing directory on the
compute node. This appears to be a problem under only some circumstances.
tex module.While we provide some general Python and R environments in Jupyter, these do not cover all the possibilities and you might want to use custom conda environments as notebooks. In general there are two ways to accomplish this:
While the first option often works, it does not benefit from any plugins or extensions in the main Jupyter module and is not compatible with Open OnDemand. The second option will work with any Jupyter installation on the cluster.
Jupyter uses "kernelspecs" or special configuration files to determine what interpreters it can start up and make available as notebooks. To do this, you will need the "ipykernel" package (for Python) installed in your environment, though you do not need all of Jupyter. You will activate the environment you want a use and run a command to install a kernelspec.
First, activate your environment:
conda activate myspecialenv  # or other method of activating environment
conda install ipykernel  # or pip install ipykernel
Then, ensure your environment is activated and install the kernel.
conda activate myspecialenv
python -m ipykernel install --user --name myspecialenv --display-name "Python (myspecialenv)"
This command will install a kernelspec for this environment in ~/.local/share/jupyter which can be read and used by any Jupyter installation, including the system module and Open OnDemand Jupyter. The --name label is used internally while the --display-name label is what you will usually select in the interface when you want to use this environment in a notebook.
You may find more information on this process in the official IPython Kernel documentation.
Kernels for other languages may be installed to your home directory in a similar way with other Jupyter kernel packages. Please see the documentation for your language kernel or contact HPC staff for more guidance.
Installed kernels may be managed with the jupyter kernelspec command.
We recommend using HPC OnDemand to access Jupyter. This uses Open OnDemand to provide a convenient interface to launch and access Jupyter sessions in interactive jobs without requiring complex SSH tunneling setup.
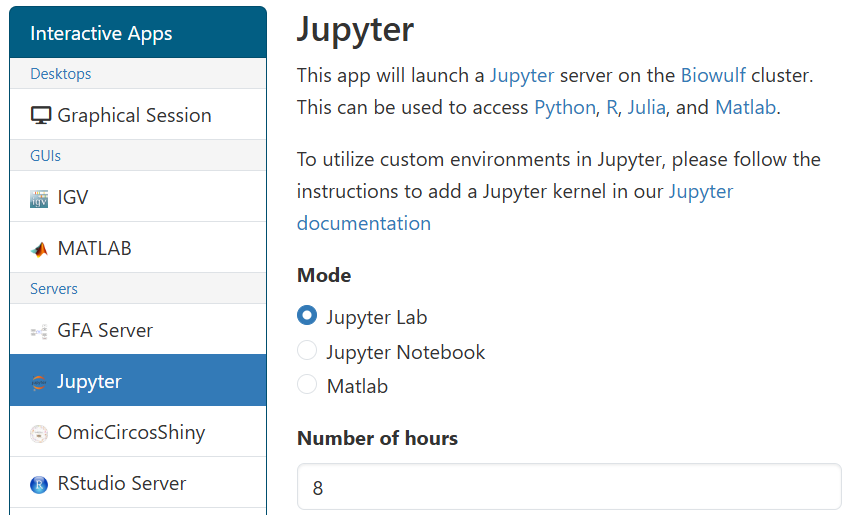
To access Jupyter via Open OnDemand, you navigate to the
Jupyter application page,
configure the resources your job requires, and launch your job. You may select between the Jupyter Notebook, Jupyter Lab, or Matlab web
interfaces in the form. You may also select the startup "working directory", equivalent to running cd before launching Jupyter
from the terminal.

If you require access to custom Python installations, please follow the guidance for installing custom kernels which may be accessed via Open OnDemand Jupyter.
For more information about Biowulf's Open OnDemand installation, access, and other services available please see our documentation.
This application can be utilized interactively via the HPC OnDemand web interface with the same power and much more convenience and stability.
Please see our Jupyter on Biowulf video for both a quick start and detailed video guide to connecting to Jupyter running in a compute node interactive session. The video shows a Windows client but is equally applicable to macOS or Linux.
In order to connect to a Jupyter Notebook running on a compute node with the browser on
your computer, it is necessary to establish a tunnel from your computer to
biowulf and from biowulf to the compute node.
sinteractive can automatically
create the second leg of this tunnel (from biowulf to the compute node) when started with
the -T/--tunnel option. For more details and information on how to set up the
second part of the tunnel see our tunneling documentation.
Successfully accessing Jupyter on the cluster from your browser is a three step process. You must ensure that you do all of the following:
-T/--tunnel
option. When you start this session up it will give you a specific
command you can use to access one port on that compute node in the format: ssh -L
#####:localhost:##### user@biowulf.nih.govssh
-L command from step 1. This is what allows your local browser to actually talk to
the Jupyter server on the compute node (forwarding that web traffic from
your local machine, through Biowulf, to the compute node), otherwise,
you will get a connection refused error.Note that the python environment hosting the jupyter install is a minimal python environment. Please use the fully featured kernels named similarly to their modules (e.g. python/3.10 or R/4.3). The kernels set up their environment so there is no need to load separate R or python modules before starting jupyter.
Allocate an interactive session and start a jupyter instance as shown below. First, we launch tmux (or screen) on the login node so that we don't lose our session if our connection to the login node drops.
[user@biowulf]$ module load tmux # You can use screen instead; you don't need to module load it
[user@biowulf]$ tmux
[user@biowulf]$ sinteractive --gres=lscratch:5 --mem=10g --tunnel
salloc.exe: Pending job allocation 46116226
salloc.exe: job 46116226 queued and waiting for resources
salloc.exe: job 46116226 has been allocated resources
salloc.exe: Granted job allocation 46116226
salloc.exe: Waiting for resource configuration
salloc.exe: Nodes cn3144 are ready for job
Created 1 generic SSH tunnel(s) from this compute node to
biowulf for your use at port numbers defined
in the $PORTn ($PORT1, ...) environment variables.
Please create a SSH tunnel from your workstation to these ports on biowulf.
On Linux/MacOS, open a terminal and run:
ssh -L 33327:localhost:33327 biowulf.nih.gov
For Windows instructions, see https://hpc.nih.gov/docs/tunneling
[user@cn3144]$ mkdir -p /data/$USER/jupyter_test
[user@cn3144]$ cd /data/$USER/jupyter_test
[user@cn3144]$ module load jupyter
[user@cn3144]$ # if you want to use R magick with python kernels you also need the rpy2 module
[user@cn3144]$ module load rpy2
[user@cn3144]$ cp ${JUPYTER_TEST_DATA:-none}/* .
[user@cn3144]$ ls -lh
total 196K
-rw-r--r-- 1 user group 7.8K Oct 1 14:31 Pokemon.csv
-rw-r--r-- 1 user group 186K Oct 1 14:31 Seaborn_test.ipynb
[user@cn3144]$ jupyter kernelspec list
Available kernels:
bash /usr/local/apps/jupyter/conda/envs/5.3.0/share/jupyter/kernels/bash
ir42 /usr/local/apps/jupyter/conda/envs/5.3.0/share/jupyter/kernels/ir42
ir43 /usr/local/apps/jupyter/conda/envs/5.3.0/share/jupyter/kernels/ir43
jupyter_matlab_kernel /usr/local/apps/jupyter/conda/envs/5.3.0/share/jupyter/kernels/jupyter_matlab_kernel
py3.10 /usr/local/apps/jupyter/conda/envs/5.3.0/share/jupyter/kernels/py3.10
py3.8 /usr/local/apps/jupyter/conda/envs/5.3.0/share/jupyter/kernels/py3.8
py3.9 /usr/local/apps/jupyter/conda/envs/5.3.0/share/jupyter/kernels/py3.9
python3 /usr/local/apps/jupyter/conda/envs/5.3.0/share/jupyter/kernels/python3
sos /usr/local/apps/jupyter/conda/envs/5.3.0/share/jupyter/kernels/sos
In the example show here I will use the convenient environment variable $PORT1 which
expands to the port reserved by sinteractive - 33327 in this example. You can also use the port number
directly. Brief explanation of the options:
notebook|lab|console--ip localhost--port $PORT1$PORT1, the variable set when using --tunnel for sinteractive--no-browserOption 1: Running Jupyter Lab
Jupyter Lab is an improved interface with additional capabilities and features.
[user@cn3144]$ jupyter lab --ip localhost --port $PORT1 --no-browser
[I 14:06:30.925 ServerApp] ipyparallel | extension was successfully linked.
[I 14:06:30.931 ServerApp] jupyter_server_mathjax | extension was successfully linked.
[I 14:06:30.931 ServerApp] jupyter_server_proxy | extension was successfully linked.
[I 14:06:30.940 ServerApp] jupyterlab | extension was successfully linked.
[I 14:06:30.940 ServerApp] jupyterlab_git | extension was successfully linked
...
[C 2022-11-21 14:06:31.112 ServerApp]

    To access the server, open this file in a browser:
        file:///spin1/home/linux/user/.local/share/jupyter/runtime/jpserver-62322-open.html
    Or copy and paste one of these URLs:
        http://localhost:40792/lab?token=xxxxxxxxxx
     or http://127.0.0.1:40792/lab?token=xxxxxxxxxx
Keep this open for as long as you're using your notebook. At this point you must make sure you have a tunnel from your PC to this specific Jupyter session.
Option 2: Running Jupyter Notebook
Jupyter Notebook is the simple, classic web interface to Jupyter.
[user@cn3144]$ jupyter notebook --ip localhost --port $PORT1 --no-browser
[I 12:48:25.645 NotebookApp] [nb_conda_kernels] enabled, 20 kernels found
[I 12:48:26.053 NotebookApp] [nb_anacondacloud] enabled
[I 12:48:26.077 NotebookApp] [nb_conda] enabled
[I 12:48:26.322 NotebookApp] ✓ nbpresent HTML export ENABLED
[W 12:48:26.323 NotebookApp] ✗ nbpresent PDF export DISABLED: No module named nbbrowserpdf.exporters.pdf
[I 12:48:26.330 NotebookApp] Serving notebooks from local directory: /spin1/users/user
[I 12:48:26.330 NotebookApp] 0 active kernels
[I 12:48:26.330 NotebookApp] The Jupyter Notebook is running at: http://localhost:33327/?token=xxxxxxxxxx
[I 12:48:26.331 NotebookApp] Use Control-C to stop this server and shut down all kernels (twice to skip confirmation).
[C 12:48:26.333 NotebookApp]

    Copy/paste this URL into your browser when you connect for the first time,
    to login with a token:
        http://localhost:33327/?token=xxxxxxxxxx
For documentation on how to connect a browser on your local computer to your jupyter instance on a biowulf compute node via a tunnel see our general tunneling documentation.
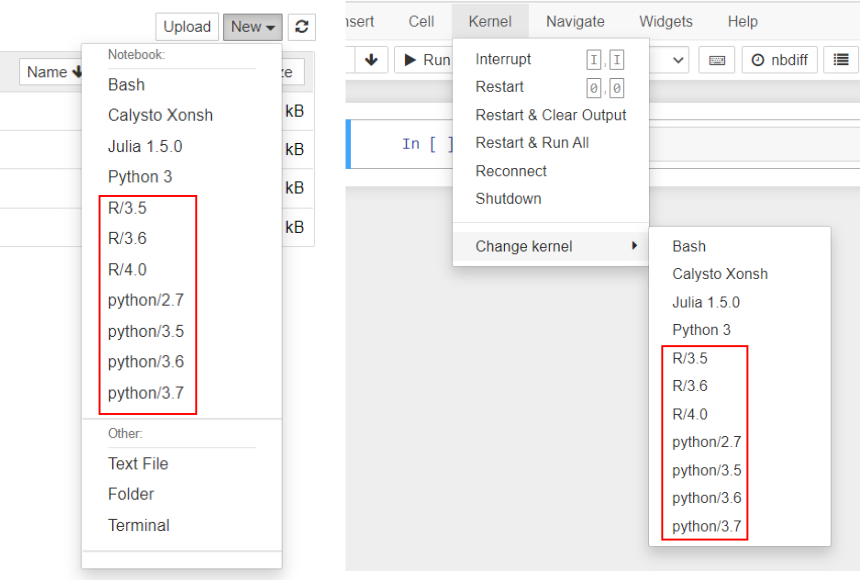
In the notebook interface the kernels highlighted in red below correspond to the equally named modules on the command line interface. Note that no modules other than jupyter has to be loaded - the kernels do all the required setup:

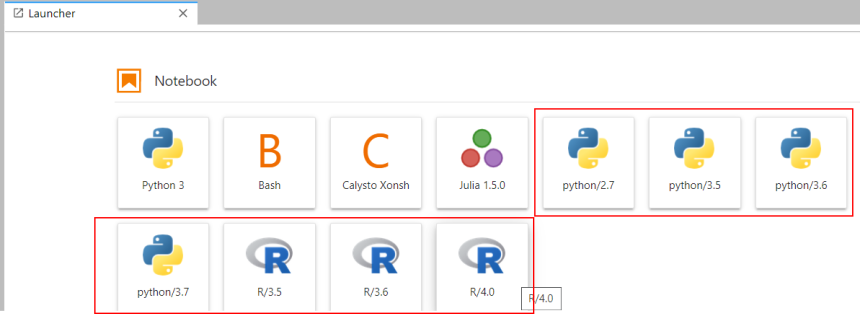
Similarly, in the Jupyter Lab interface

Kernels may change as new python or R installations are added or old ones are retired. Look for kernels with the same name as command line modules.