There are three distinct ways to run python code or applications on biowulf:
/usr/local/bin/python to the general purpose python 2.7 environment
and from /usr/local/bin/python3 to a python 3 environment/usr/bin/python3. This is the python installed with the
operating system and contains few packages. Rarely used.conda command.PYTHONNOUSERSITE=1.
This prevents installation of packages into the home directory on top of the
module python unless opted out by unsetting or changing that variable.
Coincident with the update of the Biowulf operating system there were several major changes to the python setup:
python/2.7 and python/3.7 environments and modules were retired./usr/bin/python3/usr/local/bin/python is now the Python 3.9 interpter/usr/local/bin/python3 is now python 3.8mpiexec
instead of srunThis is a list of common pitfalls for python users on the cluster. Some of these are discussed in other sections of this documentation in more detail.
OMP_NUM_THREADS. If this is done while also using
multiprocessing then batch jobs can be overloaded. For example, if creating a multiprocessing
jobs with 10 worker processes and setting OMP_NUM_THREADS also to 10,
a total of 10 * 10 = 100 threads are created. To avoid this happening accidentally
the python modules set OMP_NUM_THREADS to 1. It needs to be set to more
than one explicitly to take advantage of parallelized math libraries.
XGBClassifier (xgboost) to RandomizedSearchCV
(scikit-learn) which parallelizes the search across a parameter space. Both
will by default attempt to use all CPUs. So if there are N CPUs detected,
RandomizedSearch will start N processes running XGBClassifier and each
process will run N threads. This can be prevented by explicitly
specifying the number of parallel threads/processes at each level. In this
case, both components take `n_jobs` as an argument. The product of the two
should equal the number of available CPUs.
OMP_NUM_THREADS is not set, the numerical libraries will
attempt use all CPUs on a compute node. Unless all CPUs have been allocated
this will result in overloading the job. The general use python modules set
OMP_NUM_THREADS to 1 requiring users to explicitly set the variable higher
to take advantage of implicit multithreading. If you are using your own python
environments, please be sure to set OMP_NUM_THREADS explicitly for all
code that can potentially multithread.cpu_count() function of the multiprocessing package
always reports the total CPU count for a node. This is often the cause for overloaded
python batch jobs. Instead query the environment for SLURM_CPUS_PER_TASK
and default to 2, the minimum allocation.
[user@biowulf ~]$ sinteractive --cpus-per-task=2
...
[user@cn3444 ~]$ module load python/3.9
[user@cn3444 ~]$ python
Python 3.9.9 | packaged by conda-forge | (main, Dec 20 2021, 02:41:03)
[GCC 9.4.0] on linux
Type "help", "copyright", "credits" or "license" for more information.
>>> import multiprocessing
>>> multiprocessing.cpu_count()
56  # <-- wrong
>>> import os
>>> int(os.environ.get('SLURM_CPUS_PER_TASK', '2'))
2   # <-- right
Python includes ~/.local/lib/pythonX.X/site-packages in the
package search path. If you have packages installed there they can override the centrally
installed packages. This can lead to hard to diagnose problems. If you have problems
that are resolved by adding the -s option a broken package installed
in your home directory may be the cause.
Python modules 3.11 and newer set an environment variable PYTHONNOUSERSITE
that prevents this issue by default. This does prevent you from pip-installing
packages on top of the modules. While we recommend
conda environments when
customizing Python environments, you can restore the old behavior by unsetting this variable.
Could not connect to any X display
This can be solved by using a non-interactive backend for plotting. Which backend matplotlib uses can be changed in a couple of different ways:
matplotlib settings can be modified using a
matplotlibrc file. This file can be placed either in
the current working directory or in ~/.config/matplotlib. If
placed in the former it will only affect jobs run from this directory. If
placed in the latter, it will affect all your calls to matplotlib. For
example, if you'd like to change the default backend, create the file
~/.config/matplotlib/matplotlibrc with the following content:
backend: agg
Alternatively, you can set the MPLBACKEND environment variable
either ad hoc or in your .bashrc:
export MPLBACKEND=agg
And finally, it can also be set programatically:
>>> import matplotlib
>>> matplotlib.use("agg")
Available backends and the currently active backends can be queried interactively in python:
>>> import matplotlib
>>> matplotlib.rcsetup.interactive_bk
['GTK', 'GTKAgg', 'GTKCairo', 'GTK3Agg', 'GTK3Cairo', 'nbAgg', 'Qt4Agg', 'Qt4Cairo', 'Qt5Agg', 'Qt5Cairo', 'TkAgg', 'TkCairo', 'WebAgg', 'WX', 'WXAgg', 'WXCairo']
>>> matplotlib.rcsetup.non_interactive_bk
['agg', 'cairo', 'gdk', 'pdf', 'pgf', 'ps', 'svg', 'template']
>>> import matplotlib.pyplot as plt
>>> plt.get_backend()
'agg'
The general purpose Python environments are made available through the module system:
[user@cn3444 ~]$ module -t avail python
/usr/local/lmod/modulefiles:
python/3.8
python/3.9
python/3.10
python/3.11
python/3.12

[user@cn3444 ~]$ module load python/3.10
[+] Loading python 3.10  ...

[user@cn3444 ~]$ python
Python 3.10.8 | packaged by conda-forge | (main, Nov 22 2022, 08:23:14) [GCC 10.4.0] on linux
Type "help", "copyright", "credits" or "license" for more information.
>>> import numpy
>>>
These are fully featured (conda) environments with many installed packages including the usual modules that make up the scientific Python stack (see below). These environments best suited for development and for running code that is not dependent on specific versions of the installed packages. Packages in these environments are updated regularly. If you need more stability to ensure reproducibility or because your code depends on the presence of certain fixed versions of packages you can also build your own environments.
Because they are compiled against MKL, some mathematical operations (e.g.
SVD) can make use of multithreading to accelerate computation. The number of
threads such operations will create is determined by the environment variable
OMP_NUM_THREADS. To avoid accidentally overloading
jobs, especially when also doing multiprocessing,
this variable is set to 1 by the python modules. If your code
can take advantage of implicit parallelism you can set this variable to match
the number of allocated CPUs for cluster jobs or adjust it such that the product
of OMP_NUM_THREADS * number of processes equals the number of
allocated CPUS. For example, if allocating 16 CPUs and planning on using
multiprocessing with 4 workers, OMP_NUM_THREADS can be set as high
as 4 without overloading the allocation.
Some common issues with using multiprocessing on biowulf were already pointed
out in the common pitfalls section. Beyond those multiprocessing
can be made more robust by setting workers up to ignore the SIGINT signal
so that a multiprocessing script can be terminated cleanly with scancel
or Ctrl-C. The following script also makes sure to correctly detect
the number of available CPUs in batch jobs:
#! /usr/bin/env python

from multiprocessing import Pool
import signal
import os

def init_worker():
    """
    This is necessary to be able to interrupt the
    script with CTRL-C (or scancel for that matter).
    It makes sure that the workers ignore SIGINT so
    that any SIGINT sent goes to the master process
    """
    signal.signal(signal.SIGINT, signal.SIG_IGN)

def worker(i):
    return i*i

if __name__ == '__main__':
    # the the number of allocated cpus (or 2 if not run as a slurm job)
    nproc = int(os.environ.get("SLURM_CPUS_PER_TASK", "2"))
    print("Running on %d CPUs" % nproc)
    # set up 50 tasks
    tasks = range(0, 100)
    p = Pool(nproc, init_worker)
    try:
        # run the processing pool
        results = p.map(worker, tasks)
    except (KeyboardInterrupt, SystemExit):
        p.terminate()
        p.join()
        sys.exit(1)
    else:
        p.close()
        p.join()
        # result summary
        print("\n".join("%d * %d = %d" % (a, a, b) for a, b in zip(tasks, results)))
It is also important to benchmark scaling of your code. Many algorithms won't scale well beyond a certain number of parallel multiprocessing workers which can lead to very inefficient resource usage (e.g. allocating 56 CPUs when parallel efficiency drops below 50% at 24 CPUs).
In order to use the rpy2 package on
biowulf it is necessary to load a separate rpy2 module which
allows the package to find the correct R installation.
[user@cn3444 ~]$ module load python/3.7 rpy2
Python 3.7.5 (default, Oct 25 2019, 15:51:11)
[GCC 7.3.0] :: Anaconda, Inc. on linux
Type "help", "copyright", "credits" or "license" for more information.
>>> import rpy2
>>> import rpy2.robjects as robjects
>>> pi = robjects.r['pi']
>>> pi[0]
3.141592653589793
Ray is a framework for distributed computing. It accomplishes this by
- Providing simple primitives for building and running distributed applications.
- Enabling end users to parallelize single machine code, with little to zero code changes.
- Including a large ecosystem of applications, libraries, and tools on top of the core Ray to enable complex applications.
Ray can be used to parallelize work within a single cluster in which case it is run as a standard single node job. To run a ray cluster on biowulf and parallelize across several nodes, multinode jobs with one task per node are used. The tasks don't have to be exclusive but for real world use they often will be. If you allocate the nodes exclusively make sure to also allocate all resources available on the node.
An example script you can use to configure your own ray workloads is available on GitHub.
[user@biowulf ~]$ git clone https://github.com/NIH-HPC/biowulf_ray.git
[user@biowulf ~]$ sbatch submit-ray
Note: ray, like many other tools, will by default try to use all resources on a node even if they were not all allocated to ray. The sample script above specifically specifies resources to the workers and the cluster head process. Similarly, if you use `ray.init` in, for example, a single node job make sure to specify the number of cpus, gpus, and the memory
Spyder is a Python IDE focused on scientific python. It has the ability to connect to a remote spyder kernel running on a compute node using ssh tunnels. Currently the setup is not the most convenient but this may improve in the future.
Create an sinteractive session with the resources you need and 5 tunnels
[user@biowulf ~]$ sinteractive -TTTTT --mem=12g --cpus-per-task=2
salloc: Pending job allocation 9569310
salloc: job 9569310 queued and waiting for resources
salloc: job 9569310 has been allocated resources
salloc: Granted job allocation 9569310
salloc: Waiting for resource configuration
salloc: Nodes cn4270 are ready for job
srun: error: x11: no local DISPLAY defined, skipping
error: unable to open file /tmp/slurm-spank-x11.9569310.0
slurmstepd: error: x11: unable to read DISPLAY value

Created 5 generic SSH tunnel(s) from this compute node to
biowulf for your use at port numbers defined
in the $PORTn ($PORT1, ...) environment variables.


Please create a SSH tunnel from your workstation to these ports on biowulf.
On Linux/MacOS, open a terminal and run:

    ssh  -L 41699:localhost:41699 -L 40387:localhost:40387 -L 42289:localhost:42289 [...snip...]

For Windows instructions, see https://hpc.nih.gov/docs/tunneling
[user@cne444]$
Follow our tunneling instructions to create the tunnels from your local to biowulf. Then start a spyder kernel in the sinteractive session. In the example below we are using one of the general purpose python modules but you can also install the spyder kernel module into your own environment
[user@cn4270]$ module load python/3.10
[user@cn4270]$ spyder_kernel start
starting kernel with python '/usr/local/Anaconda/envs/py3.10/bin/python' - please hold on
----------------------------------------------------
spyder kernel started successfully
----------------------------------------------------
Kernel connection file copied to '~/kernel-652313.json' for convenience
You can use this file via hpcdrive to establish a connection to this kernel
using a remote kernel with host biowulf.nih.gov
Delete the kernel file when you are done
[user@cn4270]$ spyder_kernel status
spyder kernel state file exits
spyder kernel is running
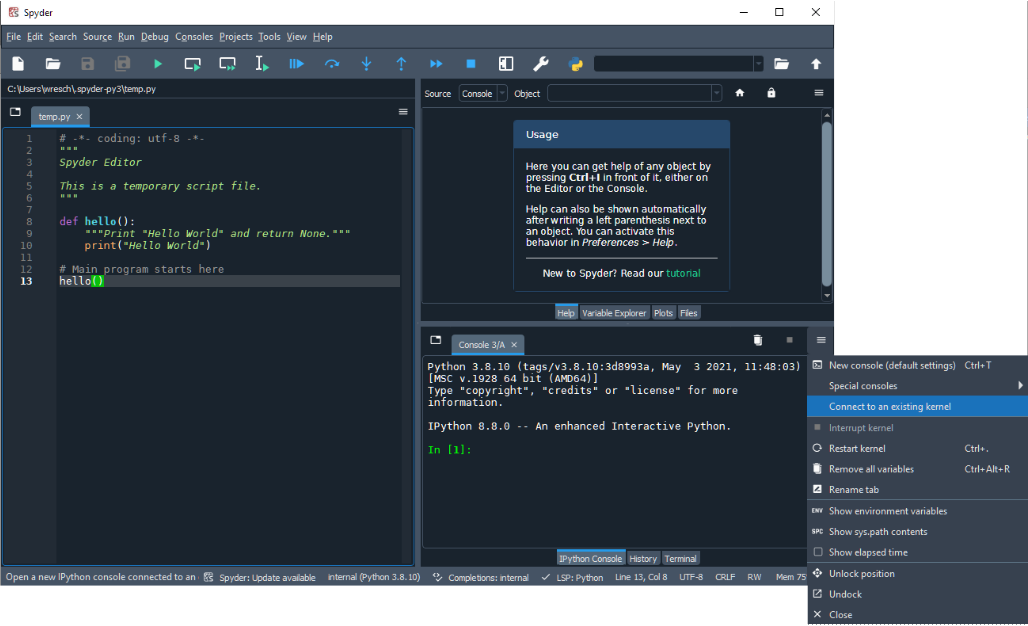
The spyder_kernel helper copies a connection file to your
home directory. In the example above ~/kernel-652313.json. You can
use this file to connect with your locally installed Spyder to the running
kernel by either copying the file to your system or mounting your home directory
as a hpcdrive. In the example below
I am using the connection file directly via hpcdrive:
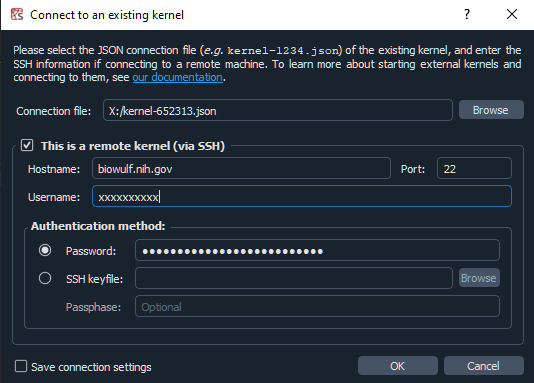
Since we are forwarding all the required ports it isn't necessary to check
the 'remote connection' box. Alternatively you can skip setting up the local
tunnels with the command generated by sinteractive and
instead provide your login credentials in the remote kernel section of the dialog.
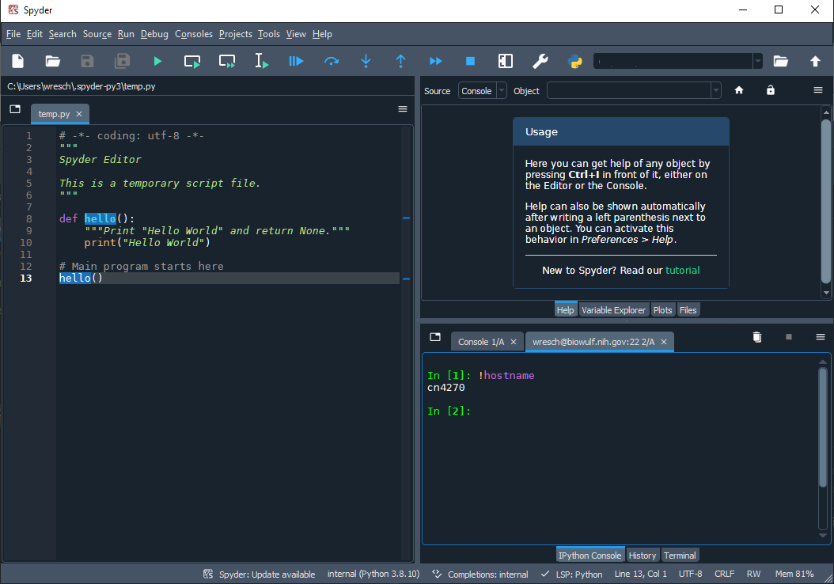
Once the connection has been established verify
that you are on a compute node
Stop the kernel when you are done by running exit() in the
spyder session or exit from the sinteractive session with
[user@cn4270]$ spyder_kernel stop
spyder kernel has been stopped