|
Quick Links
Globus is a service that makes it easy to move, sync, and share large amounts of data. Globus will manage file transfers, monitor performance,
retry failures, recover from faults automatically when possible, and report the status of your data transfer. Globus uses GridFTP for more reliable
and high-performance file transfer, and will queue file transfers to be performed asynchronously in the background.
| Globus was developed and is maintained at the University of Chicago and is used extensively at supercomputer centers and major research facilities. [Globus website] No matter how you transfer data in and out of our systems, be aware that PII and PHI data cannot be stored or transferred into the NIH HPC systems except under special arrangements.
|
On your desktop system, you will need to have Globus Connect Personal running. Point your web browser to www.globus.org. Click on 'Log on', and enter your NIH username and password on the following NIH login page. After authenticating, you will be taken to the Globus File Manager page, or can click 'File Manager' in the left bar.
- In the 'Collection' box, type 'NIH HPC Data Transfer'. You may need to authenticate: if so, you will be taken to the Globus authentication page as described above, and can authenticate with your NIH login username and password. By default, you should see the files in your /home area on Helix/Biowulf appear. You can also point to your /data area or another shared area by entering, for example, '/data/myusername' in the Path box.
- Click on 'Sync or Transfer files'.
- Enter the other endpoint, in this case the endpoint name that you gave to your desktop system when you installed Globus. You should now see both endpoints listed in two panes of the Globus window.
- To transfer files, select a file or directory on one endpoint, and click the blue 'Start' button.
- The page will now say that the transfer request submitted successfully.
- Click on 'View details' to display task detail information. Statistics are displayed at this page.
- You will also receive an email when the transfer is complete.
There are several options available for Globus transfers. (see image below).
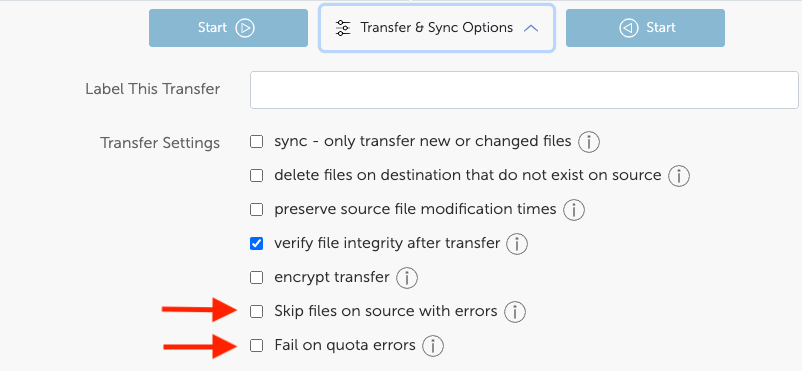
- 'Skip files on source with errors' -- if you select this option, when the transfer hits a file with misset permissions, it will continue past that file. The final Activity for the transfer will report the number of files that are skipped. Recommended to set this.
- 'Fail on quota errors' -- if you hit quota on the destination directory, the transfer will exit. Also recommended.
If you need to transfer data between two Globus Connect Personal endpoints (e.g. your desktop system and your laptop, or between two desktops), you will need a Globus Plus license. Email staff@hpc.nih.gov to request one. Your Globus Plus license will be terminated when you leave NIH.
Once you have the license, you can transfer data between your own two Globus Personal endpoints, just as between any other Globus endpoints. Note that this only applies to a single Globus user, with a Globus Plus license, running Globus Connect Personal on two different systems.
Note: in the example below, the command-line globus transfer is started on Helix, the interactive data transfer node. However, the transfer to the NIH HPC endpoint ('NIH HPC Data Transfer') will go via the 10 HPC data transfer nodes that form the Biowulf Globus endpoint. The command-line globus transfer could also be run on any of the Biowulf compute nodes.
Sample session:
[user@helix ~$ globus login
Please login to Globus here:
---------------------------
https://auth.globus.org/long/globus/URL/
---------------------------
When you point a web browser to the URL that is provided, you will need to authenticate against the NIH domain, with your usual NIH login username and password. You will then see a page like the following
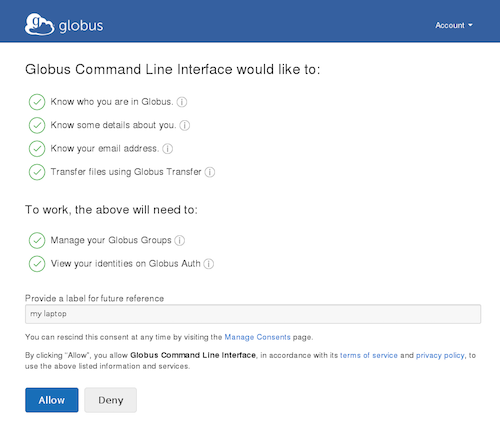
When you click Allow, you will get a page with a long authorization code. Cut-and-paste that code back into your terminal window:
Enter the resulting Authorization Code here: aabbccddeeffgg1122334455

You have successfully logged in to the Globus CLI as username@globusid.org
You can always check your current identity with
  globus whoami
Logout of the Globus CLI with
  globus logout

[user@biowulf ~]$ globus whoami
user@globusid.org
or
user@nih.gov
Depending on how recently you signed up for Globus, the command 'globus whoami' may show you your Globus userid (user@globusid.org) or your NIH userid (user@nih.gov). Once you have logged in to Globus, you can set up transfers. You will need the ID of the endpoint, which you can find using the 'globus endpoint search' command. In the example below, the user obtains a list of NIH endpoints, and then gets a listing of the user's files on one of those endpoints.
 [user@biowulf ~]$ globus endpoint search NIH

Owner                       | ID                                   | Display Name
--------------------------- | ------------------------------------ | ----------------------------------------
nihcitoir@globusid.org      | 4bc66d32-5057-11e6-8238-22000b97daec | NIH CIT OIR HPN
nihnhlbidir@globusid.org    | e1c214bc-63d5-11e6-833f-22000b97daec | NIH NHLBI DIR
nihhpc@globusid.org         | e2620047-6d04-11e5-ba46-22000b92c6ec | NIH HPC Data Transfer
nihnci@globusid.org         | e1c6b3bd-6d04-11e5-ba46-22000b92c6ec | nihnci#NIH-NCI-TRANSFER1

[...]
[user@biowulf ~]$ globus ls 'e2620047-6d04-11e5-ba46-22000b92c6ec'

Globus CLI Error: A Transfer API Error Occurred.
HTTP status: 400
request_id: CXOFvSFsb
code: ClientError.ActivationRequired
message: The endpoint 'e2620047-6d04-11e5-ba46-22000b92c6ec' is not activated
Go to https://www.globus.org/app/endpoints and activate endpoint. (10 day limit)
The error above with 'globus ls' means you may need to 'activate' the Globus endpoints you plan to use. Once an endpoint is activated, it will stay active for 10 days. If your transfer is not completed within 10 days, you'll get an email message requesting you to re-activate the endpoint, and once you've done that the transfer will resume. You can check the status of endpoints at https://www.globus.org/app/endpoints . Once your endpoints are activated, you can set up transfers.
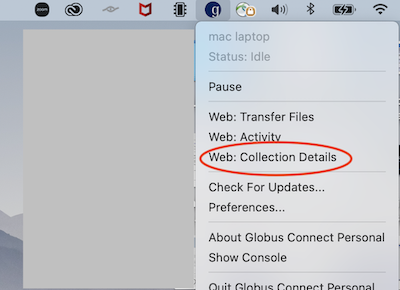
Tip: to find the UUID of your own Globus Connect Personal endpoint (e.g. your laptop), go to Globus -> Web: Connection Details. It will show the Display Name and UUID.
Sample transfer command below. Replace 'SourceUUID' with the UUID of the source endpoint, and /data1/ExomeSequenceData with the full path of the files on the source. In this example, the destination endpoint is Biowulf. Replace /data/$USER/mydir/ with the full path of the Biowulf location where you want to put the files.
[user@biowulf ~]$ globus transfer --recursive --no-verify-checksum \
	SourceUUID:/data1/ExomeSequenceData/ \
	e2620047-6d04-11e5-ba46-22000b92c6ec:/data/$USER/mydir/
Message: The transfer has been accepted and a task has been created and queued for execution
Task ID: 6924b21e-f54b-11e6-ba69-22000b9a448b
You can use the method above in your Biowulf batch scripts, for example, to transfer data at the end of a job. [Example]
Documentation about the Globus CLI
See the Globus Sharing page for information on how to share data with collaborators.
See the Cloud connectors page for information on how to use Globus to AWS S3 and Google Cloud Storage.