Transferring data to/from the NIH HPC systems

There are several secure options for transferring files to and from Biowulf and Helix. Detailed setup & usage instructions for each method are below.

No matter how you transfer data in and out of the systems, be aware that PII and PHI data cannot be stored or transferred into the NIH HPC systems.

Data transfer and sharing using Globus

Globus is a service that makes it easy to move, sync, and share large amounts of data. It is the recommended way to transfer data to and from the HPC systems.

Globus will manage file transfers, monitor performance, retry failures, recover from faults automatically when possible, and report the status of your data transfer. Globus uses GridFTP for more reliable and high-performance file transfer, and will queue file transfers to be performed asynchronously in the background.

Setting up a Globus account, transferring and sharing data

Interactive Data Transfers

Interactive Data Transfers should be performed on helix.nih.gov, the designated system for interactive data transfers and large-scale file manipulation. (An interactive session on a Biowulf compute node is also appropriate). Such processes should not be run on the Biowulf login node. For example, tarring and gzipping a large directory, or rsyncing data to another server, are examples of such interactive data transfer tasks.

Mount HPC Systems Directories To Desktop (Inside NIH Network Only):

The HPC System Directories, which include /home, /data, and /scratch, can be mounted to your local workstation if you are on the NIH network or VPN, allowing you to easily drag and drop files between the two places. Note that this is most suitable for transferring small file. Users transferring large amounts of data to and from the HPC systems should continue to use scp/sftp/globus.

Mounting your HPC directories to your local system is particularly userful for viewing HTML reports generated in the course of your analyses on the HPC systems. For these cases, you should be able to navigate to and select the desired html file to open them in your local system's web browser.

Directions for Locally mounting HPC System Directories

Transferring files between NIH Box, NIH OneDrive and HPC systems
GUI File Transfer Clients:
Windows: WinSCP
  1. Download from winscp.net and install it. Administrator privilege may be needed.

  2. To open WinSCP, click on the search icon at the bottom left corner on your desktop. Type 'winscp', double click on it to open.

  3. WinSCP Search

  4. Select 'sFTP', fill the host name as helix.nih.gov, your NIH login username and password, then click 'Login'.

  5. WinSCP Login Screen

  6. Click 'Yes'. This window only show up the first time you use WinSCP.

  7. WinSCP Add Server Host Key

  8. Click 'continue' in the authentication bar.

  9. Authentication bar

  10. The left panel shows the directories on your desktop PC and the right panel shows your directories on Biowulf.

  11. WinSCP Display Panel

  12. Click on the 'Preference' icon and browse through the tags to get an idea of all the options available.

  13. WinSCP Preference Icon

  14. To locate the file source and destination, simply use the two drop down boxes. Drag and drop files or folders to start transfer.

  15. WinSCP Locate File Source

Macs: Fugu

Fugu is a graphical frontend to the commandline Secure File Transfer application (SFTP). SFTP is similar to FTP, but unlike FTP, the entire session is encrypted, meaning no passwords are sent in cleartext form, and is thus much less vulnerable to third-party interception. Fugu allows you to take advantage of SFTP's security without having to sacrifice the ease of use found in a GUI. Fugu also includes support for SCP file transfers, and the ability to create secure tunnels via SSH.

  1. Download Fugu from the U. Mich. Fugu website.

  2. . For OSX 10.5 and above, download from cnet.com.
  3. Doubleclick on the downloaded Fugu_xxxx.dmg file to open. A small window with the Fugu icon will appear,

    Fugu Icon

    Grab the fish and copy it to your Applications folder, your Desktop and/or your Dock.

  4. Start Fugu by clicking on the Fugu icon. In the box for 'Connect to:', enter 'helix.nih.gov' and click 'Connect'. Enter your NIH Login password when requested. You should now see a window with one pane listing files on your local desktop machine, and the other pane listing files in your Biowulf/Helix account space.

  5. Fugu Display Panel

You can now transfer files by dragging and dropping between the two panes.
Commandline File Transfer:
Windows: secure FTP and secure copy with PuTTY

Both psftp and pscp are run through the Windows console (Command Prompt in start menu), and require the directory to the PuTTY executables be included in the Path environment variable. This can be done transiently through the console:

PuTTY Command Window

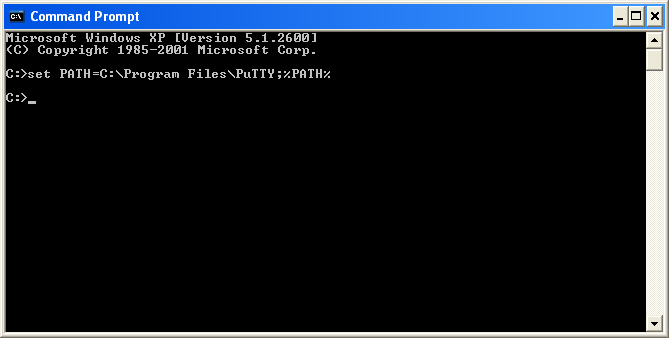
or permanently through the System Control Panel (see here for more information).

pscp

Secure Copy (pscp) is a command line mechanism for copying files to and from remote systems.

From the console, type 'pscp'. This will bring up a help menu showing all the options for pscp.

PuTTY Secure Copy client Release 0.58 Usage: pscp [options] [user@]host:source target pscp [options] source [source...] [user@]host:target pscp [options] -ls [user@]host:filespec Options: -V print version information and exit -pgpfp print PGP key fingerprints and exit -p preserve file attributes -q quiet, don't show statistics -r copy directories recursively -v show verbose messages -load sessname Load settings from saved session -P port connect to specified port -l user connect with specified user -pw passw login with specified password -1 -2 force use of particular SSH protocol version -4 -6 force use of IPv4 or IPv6 -C enable compression -i key private key file for authentication -batch disable all interactive prompts -unsafe allow server-side wildcards (DANGEROUS) -sftp force use of SFTP protocol -scp force use of SCP protocol

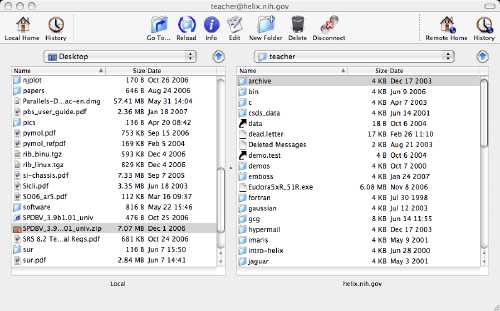
To copy a file from the local Windows machine to a user's home directory on Helix, type

C:> pscp localfile user@helix.nih.gov:/home/user/localfile

You will be prompted for your NIH login password, then the file will be copied.

To do the reverse, i.e. copy a remote file from helix to the local Windows machine, type

C:> pscp user@helix.nih.gov:/home/user/remotefile .

(you must include a '.' to retain the same filename, or explicitly give a name for the remotefile copy).

psftp

Secure FTP (psftp) allows for interactive file transfers between machines in the same way as good old FTP (non-secure) did.

From the console, type 'psftp'. This will start a sFTP session, but it will complain that no connection has been made. To transfer a local file to helix, at the psftp prompt type:

psftp> open user@helix.nih.gov

You will again be prompted for a password.

Once a session to helix has been established, the standard FTP commands can be used.

For even more information, see https://www.chiark.greenend.org.uk/~sgtatham/putty/

Macs & Unix/Linux: Secure Copy

scp is a secure, encrypted way to transfer files between machines. It is available on Macs and Unix/Linux machines. Transfers should not be performed on the Biowulf login node, as they will be subject to automatic termination if they use more than a little CPU, memory or walltime. Instead, use Helix for interactive data transfers. Since Helix and Biowulf share the same /home and /data areas, any files you transfer to Helix will also be available on Biowulf in the same path.

To transfer a file from your local machine to the HPC systems (Helix/Biowulf), any of the following will work:

Likewise, to transfer a file from the HPC systems (Helix/Biowulf), use one of the following methods:

All of the above methods will avoid use of the Biowulf login node.

If your Helix account is locked due to inactivity, you can unlock it yourself at the Dashboard.

As part of a Biowulf batch job

You may want to automatically transfer your generated results back to your local system at the end of a Biowulf batch job.

Command-line transfer as part of a batch job

Biowulf batch jobs run on the Biowulf compute nodes which are on a private network. Therefore you cannot directly scp from a Biowulf compute node to your local system. The recommended way to automatically transfer files at the end of a batch job is a Globus command line transfer.

First you should get familiar with the Globus command-line interface.

Then add something like the following at the end of your Biowulf batch job:

#!/bin/bash

# process your data
..... some batch job commands ....

# now set up a Globus command-line transfer to copy the results back to your local system
globus transfer --recursive  \
	e2620047-6d04-11e5-ba46-22000b92c6ec:/data/user/mydir/
	d8eb36b6-6d04-11e5-ba46-22000b92c6ec:/data1/myoutput/ \
The output from the last line of this batch script, which will appear in the usual slurm-#####.out output file, will be a Globus task id of the form
Task ID: 2fdd385c-bf3e-11e3-b461-22000a971261

To/from Cloud/Object storage

Specialized file transfer tools

Some sources of biological data have specialized tools for file transfer.

Downloading data from NCBI:

NCBI makes a large amount of data available through the NCBI ftp site, and also provides most or all of the same data on their Aspera server. Aspera is a commercial package that has considerably faster download speeds than ftp. More details in the NCBI Aspera Transfer Guide.

Note that SRA or dbGaP downloads are better done via the SRAtoolkit.

via the Aspera command line client
You can use the Aspera command-line client (ascp) on Helix to download data from NCBI directly into your Biowulf/Helix account space. Aspera transfers can put a heavy I/O load on the Biowulf login node, and will not work from the Biowulf compute nodes, so please perform all Aspera transfers on Helix, the interactive file transfer system.

You do not need to load any modules. The 'ascp' command is available on Helix by default. If desired, you can set an alias for ascp that includes the key, e.g

alias ascp="/usr/bin/ascp -i /opt/aspera/asperaweb_id_dsa.openssh"

Sample session (user input in bold):

helix% ascp -T -i /opt/aspera/asperaweb_id_dsa.openssh  -l 300M \
       anonftp@ftp-trace.ncbi.nlm.nih.gov:/snp/organisms/human_9606/ASN1_flat/ds_flat_ch1.flat.gz \
       /scratch/$USER

ds_flat_ch1.flat.gz                                                          100% 5523MB  291Mb/s    02:41
Completed: 5656126K bytes transferred in 161 seconds

If your download stops before completion, you can use the -k2 flag to resume transfers without re-downloading all the data. e.g.

helix% ascp -T -i /opt/aspera/asperaweb_id_dsa.openssh -k2 -l500M \
         anonftp@ftp-trace.ncbi.nlm.nih.gov:/snp/organisms/human_9606/ASN1_flat /data/user/
ds_flat_ch1.flat.gz                                       100%  323MB  0.0 b/s    00:03    
[...]
ds_flat_chPAR.flat.gz                                     100% 7742KB  402 b/s    00:01    
ds_flat_chUn.flat.gz                                      100%   39MB  107Mb/s    00:00    
ds_flat_chX.flat.gz                                       100%  104MB  196Mb/s    00:18    
ds_flat_chY.flat.gz                                       100%   14MB  3.3Mb/s    04:59    
Completed: 1706213K bytes transferred in 301 seconds
 (46432K bits/sec), in 30 files, 1 directory.
In the example above, the client skips over the files that had previously been transferred, and will download only the remaining files.

Typical file transfer rates from the NCBI server are 400 - 500 Mb/s, so '-l500M' is the recommended value.

via the Aspera browser plugin
Data transfer by this method will be slower than using the command-line client on Helix, but may be more convenient for smaller transfers. You will need to download the free Aspera client browser plugin, install it on your desktop browser, and download the data to a Helix/Biowulf data area that is mapped onto your desktop system.

  1. Download the Aspera Connect browser plugin from the Aspera website and install on your Mac, Windows, or Linux system.
  2. Map your Helix /data or /scratch area on your desktop system as described in the section above on Mapped Network Drive.
  3. Start up Aspera Connect on your Mac, Windows or Linux system. Go to Preferences->Network, and set the connection speed to the maximum value. In our tests, the actual typical download speed to a desktop system is 50 - 100 Mb/s.
  4. Point your browser to the NCBI Aspera server and select the directory or files you want to download. Select your Helix data or scratch areas as the download target area. You can monitor the download in the Aspera transfer manager window.

    By clicking on the icon in the transfer manager window, you can open the Transfer Monitor which will show a more detailed graph of the transfer rate

via FTP
It is also possible to download data from NCBI using ftp. In our tests, the Aspera client gave up to 5x faster transfer speeds than NCBI. However, some data may only be available on the NCBI ftp server.

On Helix or Biowulf, use ftp ftp.ncbi.nlm.nih.gov to access the NCBI ftp site. Sample session (user input in bold):

helix%  ftp ftp.ncbi.nlm.nih.gov
Connected to ftp.wip.ncbi.nlm.nih.gov.
220-
 Warning Notice!
[...] 
 ---
 Welcome to the NCBI ftp server! The official anonymous access URL is ftp://ftp.ncbi.nih.gov
 
 Public data may be downloaded by logging in as "anonymous" using your E-mail address as a password.
 
 Please see ftp://ftp.ncbi.nih.gov/README.ftp for hints on large file transfers
220 FTP Server ready.
500 AUTH not understood
KERBEROS_V4 rejected as an authentication type
Name (ftp.ncbi.nlm.nih.gov:user): anonymous
331 Anonymous login ok, send your complete email address as your password.
Password:
230 Anonymous access granted, restrictions apply.
Remote system type is UNIX.
Using binary mode to transfer files.
ftp> cd blast/db/
250 CWD command successful
ftp> get wgs.58.tar.gz
local: wgs.58.tar.gz remote: wgs.58.tar.gz
227 Entering Passive Mode (130,14,29,30,195,228)
150 Opening BINARY mode data connection for wgs.58.tar.gz (983101055 bytes)
226 Transfer complete.
983101055 bytes received in 1.3e+02 seconds (7.7e+03 Kbytes/s)
ftp> quit
221 Goodbye.

helix% 
Uploading data to SRA or dbGaP:

via the Aspera command line client
You can use the Aspera command-line client (ascp) on Helix to upload data to NCBI directly. Aspera transfers can put a heavy I/O load on the Biowulf login node, and will not work from the Biowulf compute nodes, so please perform all Aspera transfers on Helix.

You do not need to load any modules. The 'ascp' command is available on Helix by default. However you need to get the private SSH key file from NCBI. Sample session (user input in bold):

Uploading to SRA:
[NCBI documentation for SRA uploads]

helix% ascp -i /opt/aspera/aspera_tokenauth_id_rsa \
           -QT -l 300m -k1 \
           -d /path/to/directory \
           subasp@upload.ncbi.nlm.nih.gov:uploads/<user@email.com_xxxxx>
	
where xxxxxx is the string provided by NCBI for this upload.

If your download stops before completion, you can use the -k2 flag to resume transfers without re-downloading all the data.

Uploading to dbGaP:
[NCBI documentation for dbGap uploads] To upload to dbGaP, you need to obtain the upload information from NCBI. Then run a command like:

helix% export ASPERA_SCP_PASS=######-#####-#####-###
  
helix% ascp -i /opt/aspera/aspera_tokenauth_id_rsa -Q -l 300m -k 1 \
    -d /path/to/directory \
    asp-dbgap@gap-submit.ncbi.nlm.nih.gov:/protected
where the value of ASPERA_SCP_PASS has been provided by NCBI. Note: Do not use the -T flag for dbGaP uploads.
Uploading GEO data:

NCBI's Gene Expression Omnibus (GEO) is a public functional genomics data repository. To submit to GEO, you need to register for an account and obtain the GEO FTP credentials (including your account-specific GEO submission directory).

via Secure Copy
You can use scp on Helix to upload data to NCBI's GEO FTP site. To transfer files with scp, the GEO destination host is specified as geoftp@sftp-private.ncbi.nlm.nih.gov:uploads/your_geo_workspace. Replace your_geo_workspace with your specific GEO submission directory. Use the GEO FTP credentials to authenticate.

Sample session (user input in bold, comments after ##):


helix% ## Upload a single file
helix% scp sample.fq.gz geoftp@sftp-private.ncbi.nlm.nih.gov:uploads/abc_xyz/ 
geoftp@sftp-private.ncbi.nlm.nih.gov's password:
sample.fq.gz                                       100% 2672MB  43.8MB/s   01:01

helix% ## Uploading a directory containing GEO submission data
helix% scp -r submission_dir geoftp@sftp-private.ncbi.nlm.nih.gov:uploads/abc_xyz/ 

helix% ## Uploading multiple files matching filenames starting with sample1
helix% scp submission_dir/sample1* geoftp@sftp-private.ncbi.nlm.nih.gov:uploads/abc_xyz/ 

via LFTP
You can also use lftp on Helix to upload data to NCBI's GEO FTP site. To transfer files with lftp, the GEO destination host is specified as ftp://geoftp@ftp-private.ncbi.nlm.nih.gov. After authenticating with the GEO FTP password, users must change to their specific GEO submission directory.

Sample session (user input in bold):


helix% lftp ftp://geoftp@ftp-private.ncbi.nlm.nih.gov
Password:

lftp geoftp@ftp-private.ncbi.nlm.nih.gov:/> cd uploads/abc_xyz
cd ok, cwd=/uploads/abc_xyz

lftp geoftp@ftp-private.ncbi.nlm.nih.gov:/uploads/abc_xyz> mirror -R test_submission_dir
Total: 1 directory, 6 files, 0 symlinks
New: 6 files, 0 symlinks
17228023193 bytes transferred in 87 seconds (188.58M/s)

lftp geoftp@ftp-private.ncbi.nlm.nih.gov:/uploads/abc_xyz> ls
drwxrwsr-x   2 geoftp   geo          4096 Feb  5 13:57 test_submission_dir

lftp geoftp@ftp-private.ncbi.nlm.nih.gov:/uploads/abc_xyz> exit

Uploading to OpenNeuro

OpenNeuro.org is a free and open platform for validating and sharing BIDS-compliant MRI, PET, MEG, EEG, and iEEG data. Data can be uploaded directly from Biowulf using the openneuro command-line tool. It is best to do this on Helix, the designated interactive data transfer node.

Sample session
helix% module load OpenNeuro_cli
[+] Loading nodejs
[+] Loading OpenNeuro_cli 4.14.3  ...

helix% openneuro login
You will be prompted to choose an OpenNeuro instance (e.g. openneuro.org). You will then be asked to provide an API key.
You can get one from https://openneuro.org/keygen after having logged in via the browser.
You will then be asked whether they want to enable error reporting.
Then, to actually upload the data:
helix% openneuro upload PATH_TO_BIDS_FOLDER
Use the -i flag to ignore warnings.

Note: if you get errors during the upload, you might want to try an older version of OpenNeuro, specifically the 4.12.1 which has worked for some NIH users.

helix% module load OpenNeuro_cli/4.12.1
helix% NODE_OPTIONS=--no-experimental-openneuro upload PATH_TO_BIDS_FOLDER
Thanks to Lina Teichman, NIMH for testing and providing these commands.
Transfers from the Biowulf compute nodes:

By design, the Biowulf cluster is not connected to the internet. However, files can be transferred to and from the cluster using a Squid proxy server. Click on the link below for more details on how to use the proxy server.

via the proxy server
A proxy server has been set up so that the compute nodes can download data from hosts on the internet. The proxy server will handle a limited set of protocols: http, https, rsync, ftp. Any other program that uses one of the following environment variables will also work.
http_proxy
ftp_proxy
RSYNC_PROXY
https_proxy
This includes programs such as wget, curl, lftp, rsync, and git.
  • wget example:
    [user@cn1875 ~]$ wget http://www.nih.gov
    --2015-10-01 12:47:48--  http://www.nih.gov/
    Resolving dtn02-e0... 10.1.200.238
    Connecting to dtn02-e0|10.1.200.238|:3128... connected.
    Proxy request sent, awaiting response... 200 OK
    Length: unspecified [text/html]
    Saving to: "index.html"
    
        [ <=>                                                                                                                                    ] 38,836      --.-K/s   in 0.002s
    
    2015-10-01 12:47:48 (18.5 MB/s) - "index.html" saved [38836]
    
  • curl example:
    [user@cn1875 ~]$ curl -o nih_homepage.html http://www.nih.gov
      % Total    % Received % Xferd  Average Speed   Time    Time     Time  Current
                                     Dload  Upload   Total   Spent    Left  Speed
    100 38836    0 38836    0     0  2547k      0 --:--:-- --:--:-- --:--:-- 2917k
    
    
  • lftp example:
    [user@cn1875 ~ ]$ lftp ftp.redhat.com
    lftp ftp.redhat.com:~> ls
    drwxr-xr-x  --  /                    
    drwxr-xr-x  --  ..
    lrwxrwxrwx            -  2009-12-19 00:00  pub -> .
    drwxr-xr-x            -  2015-03-18 00:00  redhat
    lftp ftp.redhat.com:~> exit 
    
  • rsync example:
    [user@cn1875 ~ ]$ rsync mirror.umd.edu::centos/timestamp.txt $HOME/tmp
    

    Note: rsync from the compute nodes with the SSH protocol is not supported. Only the rsync protocol is supported (notice the double colon in the command above). Therefore, the following will not work:

    [user@cn1875 ~ ]$ rsync server.nih.gov:~/file.txt $HOME/tmp
    

  • git clone example:
    Note that git requests to "git://some/URL" will not work. Due to the protocol limitations on the proxy server, the URL has to be "http://some/URL" or "https://some/URL".
    [user@cn1875 ~ ]$ git clone https://github.com/ncbi/sra-tools.git
    Initialized empty Git repository in /home/user/sra-tools/.git/
    remote: Counting objects: 7447, done.
    remote: Compressing objects: 100% (137/137), done.
    remote: Total 7447 (delta 79), reused 0 (delta 0), pack-reused 7309
    Receiving objects: 100% (7447/7447), 15.81 MiB | 5.73 MiB/s, done.
    Resolving deltas: 100% (4868/4868), done.
    
  • NCBI applications such as SRA-toolkit, NCBI-ngs, ngs-bam, ncbi-vdb, Entrez Direct and related applications such as hisat have been configured to automatically download data from NCBI as necessary. See the application page for details.
HPC Staff Notes and Comments

The rate of data transfer is only an issue for data amounts greater than 256MB. For amounts less than this, any application will suffice. To optimize transfer rates for large amounts of data, use less demanding encryption ciphers, such as blowfish or arcfour, and try to transfer the data when the network is less busy (before 10 am and after 6 pm). Also use the most appropriate application based on the table below.

The HPC Staff has compared the applications and our results are below. For the most part we recommend using Globus for most transfers. scp is the default and best option for Linux/Unix machines.

Platform Application Pros Cons
All platforms Globus Best transfer method. Clients available for all platforms, web-based. Notifications sent on completion. The client (Globus Connect Personal or Globus Connect Server) must be installed on the non-Biowulf endpoint, which may require admin access to that system. (More info)
Windows WinSCP Much faster transfer rates than PuTTY-pscp/psftp Cumbersome user interface for changing local and remote directories.
pscp/psftp Direct command line control over process. Need to run through the command prompt, slowest transfer rates seen.
Mapped Network Drive Convenient. Fairly slow transfer rates, especially very large files.
Macs scp,sftp Can be used for scripting & automatic file transfers, fastest transfer rates non-GUI interface.
Fugu Easy to configure and use. Slower than command-line.
Mapped Network Drive Convenient drag-and-drop. Fairly slow transfer rates, especially for large files.
Linux/Unix scp,sftp Same as for Macs. Same as for Macs.